-
이번에는 3D 도형에 질감(Texture)을 표현해 보자!
우선 구 형태의 3D 도형 네 개를 만들어 로드했다.
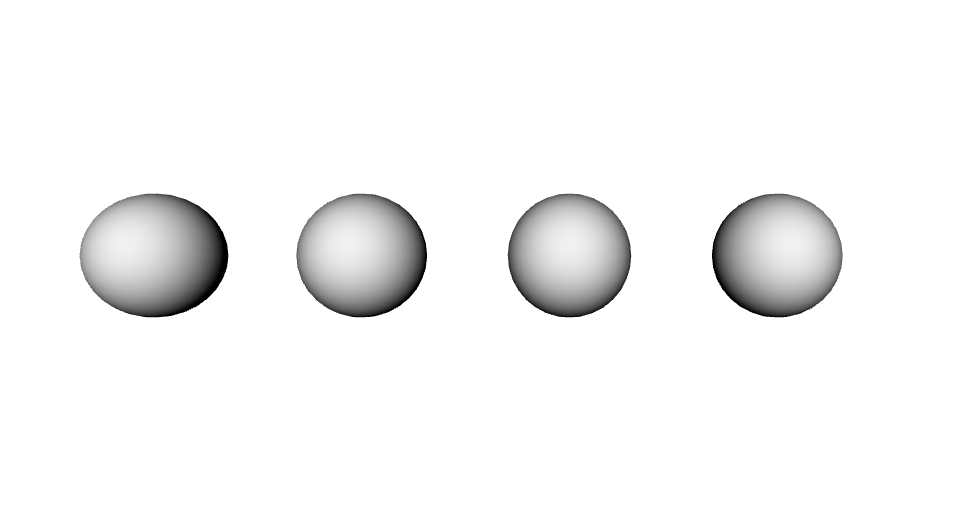
// 구 도형 추가
const geometry1 = new THREE.SphereGeometry(0.3, 32, 16)
const material1 = new THREE.MeshStandardMaterial({ color: 0xeeeeee })
const sphere1 = new THREE.Mesh(geometry1, material1)
sphere1.position.x = -2
scene.add(sphere1)

const geometry2 = new THREE.SphereGeometry(0.3, 32, 16)
const material2 = new THREE.MeshStandardMaterial({ color: 0xeeeeee })
const sphere2 = new THREE.Mesh(geometry2, material2)
sphere2.position.x = -1
scene.add(sphere2)

const geometry3 = new THREE.SphereGeometry(0.3, 32, 16)
const material3 = new THREE.MeshStandardMaterial({ color: 0xeeeeee })
const sphere3 = new THREE.Mesh(geometry3, material3)
sphere3.position.x = 0
scene.add(sphere3)

const geometry4 = new THREE.SphereGeometry(0.3, 32, 16)
const material4 = new THREE.MeshStandardMaterial({ color: 0xeeeeee })
const sphere4 = new THREE.Mesh(geometry4, material4)
sphere4.position.x = 1
scene.add(sphere4)
📌 Texture 입히기
텍스처를 추가하는 방법은 텍스처를 로드하기 위한 클래스를 선언하고, 텍스처로 활용할 이미지를 load 함수를 활용해 로드해 준다.
const texture = new THREE.TextureLoader().load('textures/파일명.jpg' );
const material = new THREE.MeshBasicMaterial( { map: texture } );
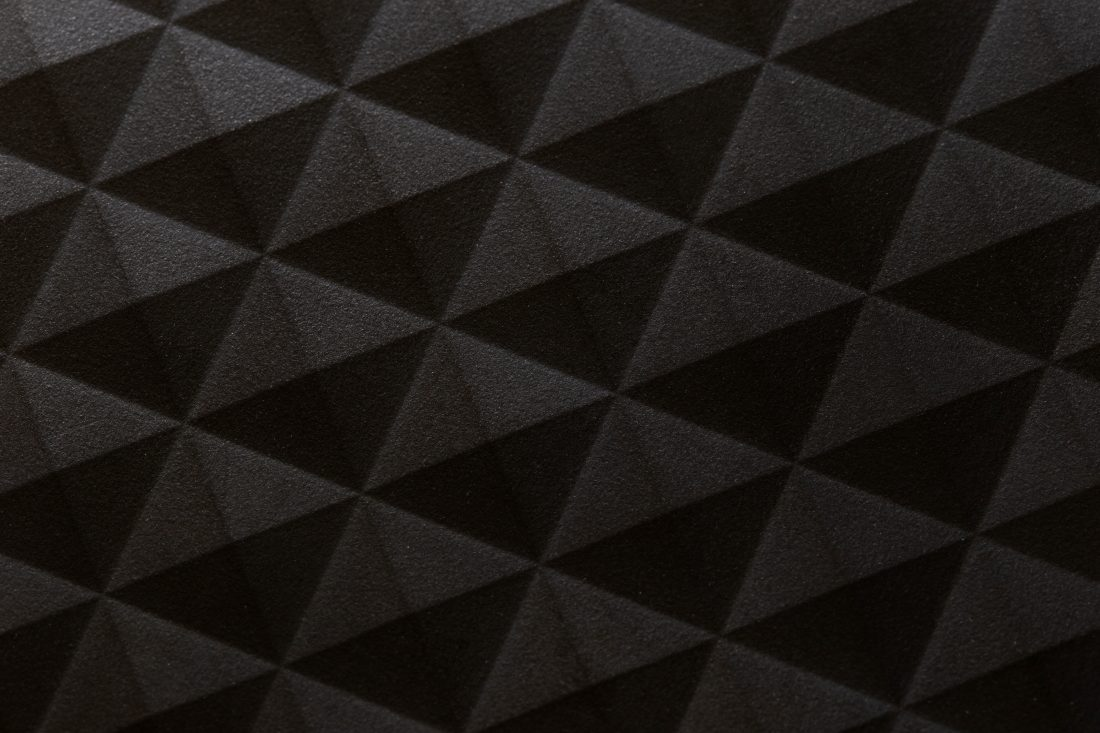
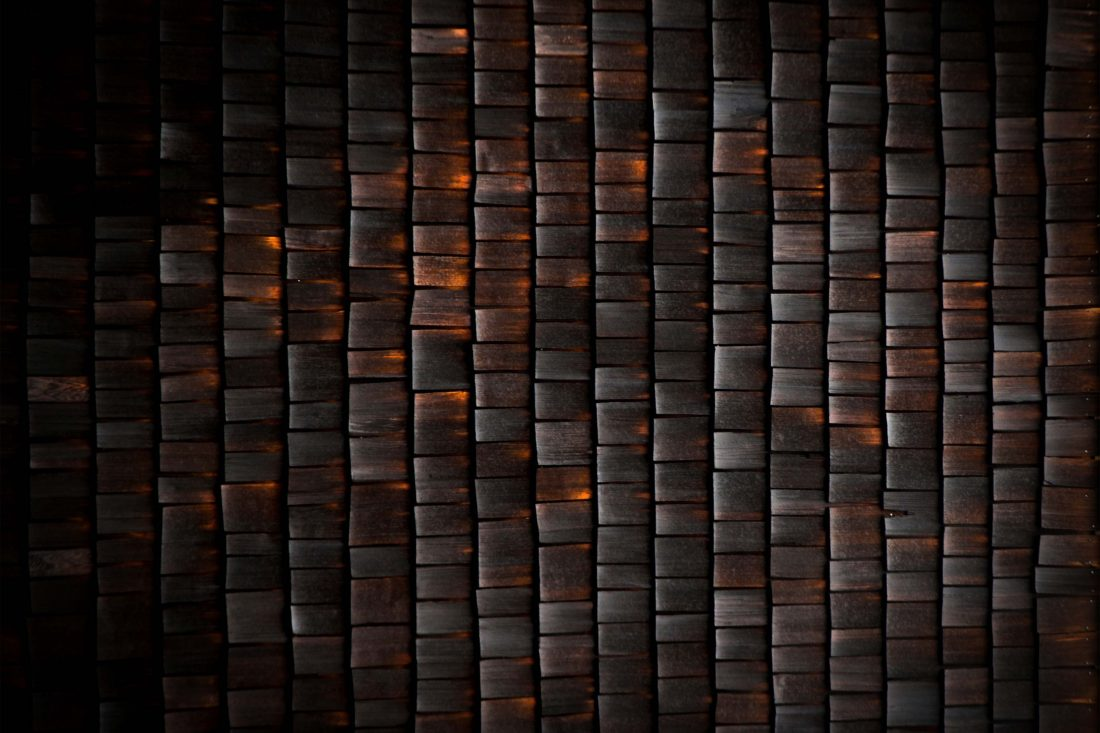
위의 이미지와 같이 static 폴더 내에 img 폴더를 만들고, 텍스처로 활용할 이미지를 만들었다.
텍스처 이미지는 아래의 4개를 사용했다.


그리고 아래와 같이 텍스처를 로드해 주었다.
// 텍스처 추가
const textureLoader = new THREE.TextureLoader()
const textureColor1 = textureLoader.load('../static/img/texture-1.jpg')
const textureColor2 = textureLoader.load('../static/img/texture-2.jpg')
const textureColor3 = textureLoader.load('../static/img/texture-3.jpg')
const textureColor4 = textureLoader.load('../static/img/texture-4.jpg')
텍스처를 도형에 연결하는 방법은 다음과 같다.
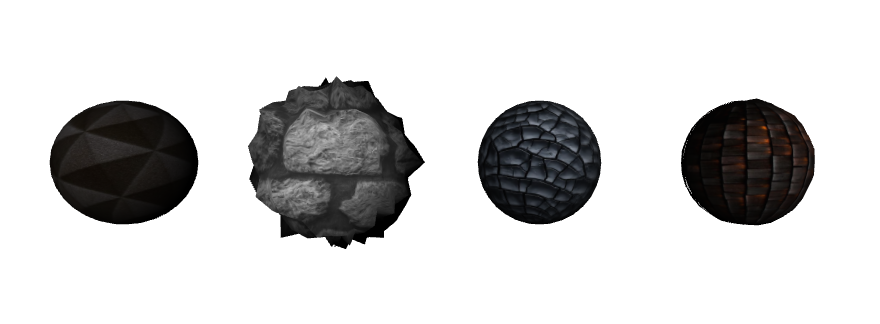
// 기존의 color 옵션을
const material1 = new THREE.MeshStandardMaterial({ color: 0xff7f00 })

// map 옵션으로 변경 후 만들어둔 텍스처를 연결해준다.
const material1 = new THREE.MeshStandardMaterial({ map: textureColor1 })
위에서 만들었던 구 형태의 도형에 각각 텍스쳐를 연결해 보았다.
// 구 도형 추가
const geometry1 = new THREE.SphereGeometry(0.3, 32, 16)
const material1 = new THREE.MeshStandardMaterial({ map: textureColor1 })
const sphere1 = new THREE.Mesh(geometry1, material1)
sphere1.position.x = -2
scene.add(sphere1)

const geometry2 = new THREE.SphereGeometry(0.3, 32, 16)
const material2 = new THREE.MeshStandardMaterial({ map: textureColor2 })
const sphere2 = new THREE.Mesh(geometry2, material2)
sphere2.position.x = -1
scene.add(sphere2)

const geometry3 = new THREE.SphereGeometry(0.3, 32, 16)
const material3 = new THREE.MeshStandardMaterial({ map: textureColor3 })
const sphere3 = new THREE.Mesh(geometry3, material3)
sphere3.position.x = 0
scene.add(sphere3)

const geometry4 = new THREE.SphereGeometry(0.3, 32, 16)
const material4 = new THREE.MeshStandardMaterial({ map: textureColor4 })
const sphere4 = new THREE.Mesh(geometry4, material4)
sphere4.position.x = 1
scene.add(sphere4)
다음과 같이 텍스처가 입혀진 구 형태의 도형이 만들어졌다!

📌 굴곡 추가하기
두 번째 도형에 울퉁불퉁한 굴곡을 표현해 보자!
const geometry2 = new THREE.SphereGeometry(0.3, 32, 16)
const material2 = new THREE.MeshStandardMaterial({
  map: textureColor2,
  displacementMap: textureColor2, // 형상을 변경하는 데 사용할 수 있는 텍스처
  displacementScale: 0.2, // 굴곡의 강도를 조절
})
const sphere2 = new THREE.Mesh(geometry2, material2)
sphere2.position.x = -1
scene.add(sphere2)
아래와 같이 울퉁불퉁한 굴곡이 표현되어 거친 돌덩이의 모습이 되었다..!
📌 조도 추가하기
네 번째 도형에 조도를 추가해 보자!
'조도(照度)'는 빛 밝기의 정도, 대상 면에 입사하는 빛의 양을 의미한다.
const geometry4 = new THREE.SphereGeometry(0.3, 32, 16)
const material4 = new THREE.MeshStandardMaterial({
  map: textureColor4,
  displacementMap: textureColor4,
  displacementScale: 0.03,
  roughnessMap: textureColor4, //. 조도 표현에 활용할 텍스처
  roughness: 0.8, // 0.0 부드러운 거울 반사를 의미하고 1.0 완전히 확산됨을 의미
})
아래와 같이 조도가 추가되어 표면에 반사되는 빛이 생겼다!

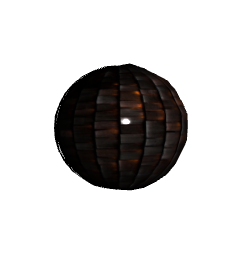
좌측(조도 추가 전) / 우측(조도 추가 후) 728x90'ThreeJS' 카테고리의 다른 글
그림자 표현하기 (0) 2023.07.31 빛의 종류에 대해 (0) 2023.07.22 도형에 재질 추가하기 (0) 2023.07.03 3D 도형 그리기 (0) 2023.07.03 Three.js 소스 구조 이해하기 (0) 2023.06.24 댓글