-
SCSS는 CSS의 단점을 보완하기 위해 등장한 스크립트 언어이다.
프로젝트의 규모가 커지고 복잡해질수록 CSS 또한 방대해지고 복잡해져서 유지보수가 힘들어진다.🤦♀️
이러한 CSS의 단점을 보완하여 복잡한 작업을 쉽게 할 수 있게 해 주고, 코드의 재활용성과 가독성을 높여주기 위해 등장한 것이 바로 SCSS이다.
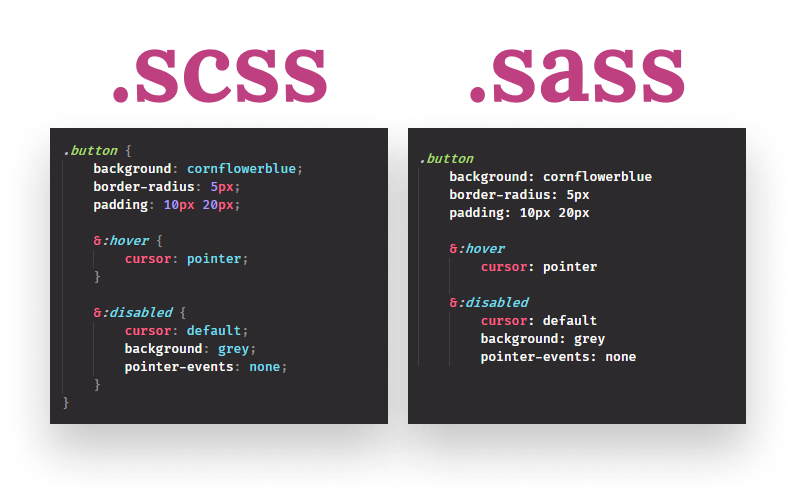
SASS도 있는데, SCSS와의 차이점을 꼽자면 중괄호와 세미콜론을 사용하느냐의 차이가 있다. SASS는 중괄호과 세미콜론을 대신해 들여 쓰기로 구문을 분리하고 작성한다. 그러다 보니 CSS문법에 익숙한 퍼블리셔들은 SASS의 문법이 낯설게 느껴진다.
SCSS는 CSS와 동일하게 중괄호와 세미콜론을 사용하고, CSS와 더 높은 호환성을 보이기에 SCSS를 더 선호한다.
📌 SCSS 주석
SCSS에서 주석 처리 방법이 두 가지가 있다.
기존 CSS 주석 처리 방식인
/* */이고, 또 하나는//방식이다./* */방식은 기존 주석 역할을 하고,//방식은 SCSS에서 CSS로 컴파일했을 때 화면과 소스상에도 표시되지 않는다. 이러한 특징을 파악해 적재적소에 효율적으로 주석처리를 하면 유용할 것 같다.$color: tomato; .container { h1 { color: $color; /*background-color:orange;*/ //font-size: 60px; -> SCSS에서 CSS로 컴파일했을 때 해당 주석은 보이지 않는다. } }📌 변수 - 재활용&재할당
반복적으로 자주 사용되는 값을 변수로 지정할 수 있다.
자바스크립트처럼 변수에는 사용가능한 범위(유효 범위)가 있다.
선언 블록
{}내에서만 유효 범위를 가진다.$size: 200px; // 전역 변수 .container { $color: pink; // 중괄호 안에서만 사용할 수 있다. position: fixed; top: $size; .item { $size: 50px; // $size 재할당 width: $size; height: $size; transform: trnaslateX($size); } left: $size }👉 css 컴파일 시
.container {
  position: fixed;
  top: 200px;
	left: 50px;
}
.container .item {
  width: 50px;
  height: 50px;
  transform: trnaslateX(50px);
}
📌 변수 - 유효범위 전역 설정
!global플래그를 사용하면 변수의 유효 범위를 전역으로 설정할 수 있다.주의할 점은 같은 이름의 변수가 있을 시 값이 덮어씌워질 수 있다.
.box1 {
  $color: #111 !global;
  background: $color;
}
.box2 {
  background: $color;
}
👉 css 컴파일 시
.box1 {
  background: #111;
}
.box2 {
  background: #111;
}
📌 SCSS 중첩
상위 선택자의 반복을 피하고 좀 더 편리하게 복잡한 구조를 작성할 수 있다.
<div class="container">
  <ul>
    <li>
      <div class="name">SCSS</div>
      <div class="age">30</div>
    </li>
  </ul>
</div>
.container { > ul { li { font-size:30px; .name { color:royalblue; } .age { color:orange; } } } }👉 css 컴파일 시
.container > ul li {
  font-size: 30px;
}
.container > ul li .name {
  color: royalblue;
}
.container > ul li .age {
  color: orange;
}
📌 & - 상위 선택자 참조
중첩 안에서 상위(부모) 선택자를 참조하여 치환한다.
.btn {
    position:relative;
    &.active {
        color:red;
    }
}

.list {
    li {
        &:last-child {
            margin-right:0;
        }
    }
}

.fs {
    &-small {font-size: 12px;}
    &-medium {font-size: 14px;}
    &-large {font-size: 16px;}
}
👉 css 컴파일 시
.btn {
  position: relative;
}
.btn.active {
  color: red;
}

.list li:last-child {
  margin-right: 0;
}

.fs-small {
  font-size: 12px;
}
.fs-medium {
  font-size: 14px;
}
.fs-large {
  font-size: 16px;
}
치환되는 특징을 활용하여 다음과 같이 응용할 수도 있다.
.fs {
  &-small { font-size: 12px; }
  &-medium { font-size: 14px; }
  &-large { font-size: 16px; }
}
👉 css 컴파일 시
.fs-small {
  font-size: 12px;
}
.fs-medium {
  font-size: 14px;
}
.fs-large {
  font-size: 16px;
}
📌 중첩 벗어나기
중첩에서 벗어나고자 할 때 사용한다.
.list {
  $w: 100px;
  $h: 50px;
  li {
    width: $w;
    height: $h;
  }
  @at-root .box {
    width: $w;
    height: $h;
  }
}
.list 안에 있는 특정 변수를 범위 밖에서는 사용할 수 없기 때문에
@at-root를 사용해주어야 한다.👉 css 컴파일 시
.list li {
  width: 100px;
  height: 50px;
}
.box {
  width: 100px;
  height: 50px;
}
📌 중첩 속성
.box {
    font: {
        weight: bold;
        size: 10px;
        family : sans-serif;
    };
    margin: {
        top: 10px;
        left: 20px;
    };
    padding: {
        top: 10px;
        bottom: 30px;
        left: 20px;
        right: 30px;
    };
}
👉 css 컴파일 시
.box {
  font-weight: bold;
  font-size: 10px;
  font-family: sans-serif;
  margin-top: 10px;
  margin-left: 20px;
  padding-top: 10px;
  padding-bottom: 30px;
  padding-left: 20px;
  padding-right: 30px;
}
📌 연산
div {
    $size: 30px;
    width: 20px + 20px;
    height: 30px - 10px;
    font-size: 10px * 2;
    margin: 30px / 2; // 나누기 연산은 인식되지 않는다. '/'가 font 단축 속성처럼 쓰이는 경우가 있기 때문
    margin: (30px / 2); // 나누기 연산은 괄호로 묶어줘야 인식된다.
    margin: $size / 2; // 혹은 변수로 만든 후 그 값을 나눌 수도 있다.
    padding: 20px % 7;
}
span {
    font-size:10px;
    line-height:10px;
    font: 10px / 10px sans-serif; //font 단축 속성
}
👉 css 컴파일 시
div {
  width: 40px;
  height: 20px;
  font-size: 20px;
  margin: 30px/2;
  margin: 15px;
  margin: 15px;
  padding: 6px;
}

span {
  font-size: 10px;
  line-height: 10px;
  font: 10px/10px sans-serif;
}
📌 재활용
스타일시트에서 재사용할 CSS 선언 그룹을 모듈화할 수 있다.
@mixin: 선언하기@include:사용하기@mixin center { display: flex; justify-content: center; align-items: center; } .container { @include center; .item { @include center; } } .box { @include center; }👉 css 컴파일 시
.container {
  display: flex;
  justify-content: center;
  align-items: center;
}
.container .item {
  display: flex;
  justify-content: center;
  align-items: center;
}
.box {
  display: flex;
  justify-content: center;
  align-items: center;
}
📌 재활용 - 인수 추가
함수처럼 인수를 가질 수 있다.
@mixin box($size) {
    width: $size;
    height: $size;
    background-color: tomato;
}

.container {
    @include box(200px);
    .item {
        @include box(100px);
    }
}
.box {
    @include box(50px);
}
👉 css 컴파일 시
.container {
  width: 200px;
  height: 200px;
  background-color: tomato;
}
.container .item {
  width: 100px;
  height: 100px;
  background-color: tomato;
}
.box {
  width: 50px;
  height: 50px;
  background-color: tomato;
}
📌 재활용 - 인수 기본값 설정
@mixin box($size: 100px) { //기본값 설정
    width: $size;
    height: $size;
    background-color: tomato;
}

.container {
    @include box(200px);
    .item {
	//인수 설정 없을 경우 기본값 출력
        @include box;
    }
}
.box {
    @include box(50px);
}

// 여러개의 인수를 넣을 수 있다.
@mixin box($size: 100px, $color: tomato) {
    width: $size;
    height: $size;
    background-color: $color;
}

.container {
    @include box(200px, red);
    .item {
		//인수 설정 없을 경우 기본값 출력
        @include box;
    }
	.text {
		//인수 중 하나만 넣을 경우 =  키워드인수
        @include box($color: green)
    }
}
.box {
    @include box(50px);
}
👉 css 컴파일 시
// 인수 기본값
.container {
  width: 200px;
  height: 200px;
  background-color: tomato;
}
.container .item {
  width: 100px;
  height: 100px;
  background-color: tomato;
}

.box {
  width: 50px;
  height: 50px;
  background-color: tomato;
}

// 인수 여러개
.container {
  width: 200px;
  height: 200px;
  background-color: red;
}
.container .item {
  width: 100px;
  height: 100px;
  background-color: tomato;
}
.container .text {
  width: 100px;
  height: 100px;
  background-color: green;
}

.box {
  width: 50px;
  height: 50px;
  background-color: tomato;
}
📌 선언된 Mixin에 스타일블록 추가
선언된 Mixin에 @content가 포함되어 있다면 해당 부분에 원하는 스타일 블록을 전달할 수 있다.
@mixin icon($url) {
  &::after {
    content: $url;
    @content;
  }
}
.icon1 {
  // icon Mixin의 기존 기능만 사용
  @include icon("/images/icon.png");
}
.icon2 {
  // icon Mixin에 스타일 블록을 추가하여 사용
  @include icon("/images/icon.png") {
    position: absolute;
  };
}
👉 css 컴파일 시
.icon1::after {
  content: "/images/icon.png";
}
.icon2::after {
  content: "/images/icon.png";
  position: absolute;
}
📌 반복문
@for $i from 1 through 10 {
    .box:nth-child(#{$i}) {
		//scss 선택자에서는 변수를 넣을 수
		//없으므로 '보간' 방식으로
        //변수를 삽입한다.
        width: 100px;
		height: 100px * $i;
    }
}
👉 css 컴파일 시
.box:nth-child(1) {
  width: 100px;
  height: 100px;
}

.box:nth-child(2) {
  width: 100px;
  height: 200px;
}

.box:nth-child(3) {
  width: 100px;
  height: 300px;
}

.box:nth-child(4) {
  width: 100px;
  height: 400px;
}

.box:nth-child(5) {
  width: 100px;
  height: 500px;
}

.box:nth-child(6) {
  width: 100px;
  height: 600px;
}

.box:nth-child(7) {
  width: 100px;
  height: 700px;
}

.box:nth-child(8) {
  width: 100px;
  height: 800px;
}

.box:nth-child(9) {
  width: 100px;
  height: 900px;
}

.box:nth-child(10) {
  width: 100px;
  height: 1000px;
}
📌 함수
@mixin center {
    display: flex;
    justify-content: center;
    align-items: center;
}

@function ratio($size, $ratio) {
    @return $size * $ratio
}
.box {
    $width: 100px;
    width: $width;
    height: ratio($width,1/2);
    @include center;
}
👉 css 컴파일 시
.box {
  width: 100px;
  height: 50px;
  display: flex;
  justify-content: center;
  align-items: center;
}
더 많은 정보는 아래 블로그 참고..!
https://heropy.blog/2018/01/31/sass/
Sass(SCSS) 완전 정복!
Style(CSS) 작업 시 필수가 되어버린 CSS Preprocessor(전처리기) Sass(SCSS)에 대해서 이해하고, CSS로 컴파일하는 방법부터 자세한 SCSS 문법까지 살펴봅니다.
heropy.blog
728x90'HTML5 , CSS3' 카테고리의 다른 글
SCSS 내장 함수 (0) 2023.09.24 gap으로 거리두기 (0) 2022.11.15 사용자 지정 CSS (0) 2022.09.02 SVG (0) 2022.09.01 pointer-event (0) 2022.09.01 댓글